Photoshop For Quick Easy Changes
posted: November 1st, 2007 | by:Bert
©Bert Gildart: Ansel Adams once said that it was the image that was important, implying that the methods to achieve a result were acceptable if the outcome proved more pleasing.

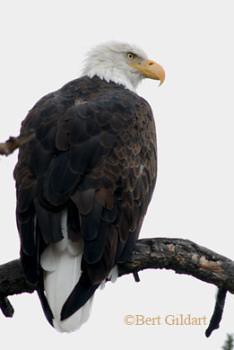
Bald Eagle on gray snowy day
With that kind of permission, I believe it is fair to manipulate an image to create a more satisfying result. In the case that follows, my techniques are analogous to using filters in black and white photography to darken the sky.
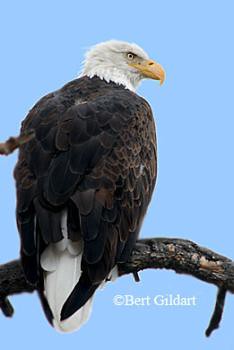
Here, I’m going to use Photoshop techniques to modify the color of the sky and make my image of this bald eagle photographed in Yellowstone National Park several weeks ago appear to have been taken under more inviting weather conditions.
PHOTO MANIPULATION
Though I’m certainly no expert when it comes to the capabilities inherent in my CS2 Version of Photoshop, friends and manuals have helped me learn a few techniques. In the course of posting blogs this past year, I have used a few of those techniques several times, as in the graveyard moon walk (see bottom photo), taken in Nova Scotia.
I manipulate photos when it’s easy to do so, and doesn’t require a great deal of my time–but of course, some of that is now a reflection of experience. What once took me hours now requires only minutes. The two images shown here provide a case in point.
The original (above) photo was taken on a cloudy, snowy day, and, as a result, the sky is gray. Changing the background was easy.
First I used the Magic Wand to separate the eagle from its background, creating two layers. Then I used the Pen Tool to sample the color I wanted as a replacement for the gray skies–the background layer. Next, I moved my cursor to the Edit portion of the program, found “Fill,” and then clicked. Voila!
IS IT ETHICAL?
Because the separation between the new background color and the eagle was not perfect, I then used the blur tool located under the Tool bar icon and blended the interface between sky and the eagle’s feathers. And that’s essentially how I got from a gray sky to a blue sky.

Bald Eagle, modified with Photoshop
Does all this manipulation border on something that is unethical if you’re shooting for publication?
Though not all contemporaries would agree, I don’t think so. Certainly it’s not like saying I photographed a wolf or a bear in the wild when really, the photograph was taken in a zoo or in an enclosure of some kind.
Again, I liken the technique to using color filters in black and white photography to intensify the sky or change tones. Those, of course, are techniques used all the time by Ansel Adams, the undisputed master of black and white photography. They’re also techniques I’ve used in the past, as in my posting of Old Two Medicine Ranger Station .
To complete the images I added the copyright symbol (copied from Symbols in Word and pasted into my Photoshop document) and my name. To match my name with colors found in the eagle’s peak (in the top image) I used the Pen tool to sample the color of the eagle’s beak, and then went to the “Type” tool.
As I began to type, the color defaulted to the color selection stipulated by the Pen tool. Finally, I went to the icon “Windows,” found layers and then from that window clicked the tab that “merged” all the layers together into one final composite image. One other technique that may or may not show in these small images is that I “sharpened” the bottom image.
How long did all that take?
Once it would have required hours, but now, no more than 20 minutes. The techniques are easy, and once you realize all you can do, you’ll be hooked. Just start slowly, realizing if you have other things to do, you’re probably looking at several months down the road before everything becomes second nature.

